SHELL TOPICS
CLEANING SHELLS
After collecting, the animals
can be removed a number of ways:
1. Place the shells in cold
water and bring slowly to the boil. Simmer for a few minutes and then allow
to cool slowly. The animal should remove easily using a hooked piece of wire.
This method should not be used with polished shells as the polish may be damaged.
2. Place the shells in a shopping
bag and place in the freezer. Leave overnight and thaw. The animal should
remove easily. Note: Polished specimens like Cowries, Olives, Margins etc.
should not be cleaned using this method as minute hairline cracks may form
in the shell polish.
3. Place shells in a bucket
of water and leave allowing the animal to rot away. Replace water regularly
as the deteriorating animal produces
acids which can damage the shell surface, especially of glossy shells. After
a few days you can either hose the remains out or flick the shell holding
onto one end so the decomposing material runs out the other end.
4. Place shells in a plastic
or glass container filled with kerosene. If there are a large number to be
cleaned insert a wire grate in the bottom of the container to keep them off
the bottom. Sit the shells on top of the grate and leave for a week, most
of the animal will decompose and fall through the grate to sit in the bottom
of the container. Remove the shells after a week and hose out. Polished specimens
come out gleaming. Use this method for Cowries, Olives, Margins etc. or any
species with a high gloss.
5. Bury the shells in sand
or soil. Place the shells upright and cover with sand. This allows the remains
to run out when the animal has decomposed. Wash out the remainder. This method
is not recommended for polished shells as body acids can collect around the
bottom of the shell and can damage polish.
6. Place shells in a solution
of 50% sea water or water and alcohol for up to a week. The animal can be
removed with a wire hook or shaken out.
Do not, with any of these methods,
leave the shells in sunlight as exposure can dull the color and ruin the gloss
on polished specimens.
With shells like Murex, Tritons,
Turbans etc. be sure to keep the operculum or trap door which is attached to
the animals foot as this completes the presentation of the specimen in the collection.
The operculum can be glued to cotton wool or tissue paper and pushed into the
shells mouth.
When the animals have been removed
give the shells a thorough clean in fresh water and leave to dry away from sunlight.
You should be able to determine if the shell is empty of contents by smelling.
Any surface growths eg. coral or calcium deposits can be removed with a sharp
object or knife. A dentists tooth probe is ideal for delicate work. For removal
of stubborn material the shell can be placed in a solution of 50% household
bleach and water. Keep trying daily to remove the material as this solution
softens calcium deposits. A 100% bleach solution will remove most periostractum
or skin often found on Cone shells within 20 minutes (do not leave in this solution
any longer than an hour). Never use acid to remove material as this may damage
delicate surfaces.
POLISHING SHELLS
When you are satisfied with
the cleaning process the shell can be oiled with a clean cloth and baby oil
(mineral oil). Do not use any other type of oil as this may damage the shell.
Do not lacquer shells as they are best kept in their natural state unless you
have a Cowrie or Olive which has been dead collected and the polish has been
eroded. With these shells the appearance can be improved considerably by oiling.
SHELL DATA
Before placing your specimens
on display - add your shells data. Most collectors have printed shell tags to
which can be added the following information:
Scientific name: (eg. Conus
bengalensis)
Authority: (eg. Okutani,1968)
This is the name of the 1st person to describe the species and when he or she
did.
Location: (eg.Bay of Bengal,
India) Where the species was found.
Data: ( Trawled in 100 metres
on sand bottom) Actual collection data for the species.
Your collection procedure for
this specimen is now complete. A specimens value is increased if the operculum
and shell data is included with the specimen. Details on shell grading is to
be found on the Information page of this site.
SHELL DISPLAY/PRESENTATION
If your collection is to be
displayed in a wooden cabinet or wooden chest of drawers your specimens need
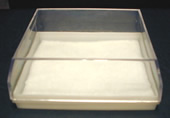
to be placed in plastic specimen boxes as shown below or similar to protect
them from acidic vapours eminating from the wood or in the case of compressed
particle board, formaldahide vapour used to glue the particle board. Over time
these vapours eat away the polish of Cowries and Olives rendering them worthless.
The plastic specimen display
boxes protect your specimens from direct contact with these harmful vapours.
|
Plastic specimen boxes - 68mm x 56mm
x 28mm high. Display your specimens with or without the clear top which
lifts off ( base depth = 10mm). 80cents each or 10 boxes for $6.
These boxes protect specimens with a
glossy surface like Cowries and Olives by preventing chemicals in the
air from interacting with the shell surface. Timber cabinets or cabinets
made from particle board leach chemicals into the atmosphere and can
cause your shells to deteriorate
|

_____________________________________________Copyright
© July 2010______________________________________________


